Learning to draw stickers is a great way to start drawing and designing because stickers tend to be simple, bright, and easy. You can sell simple designs with lines and colors overnight and build your confidence in making more complex designs. Plus – if a sticker design doesn't sell, it's not like you spent 20+ hours on it! It's just a sticker.
Learning to draw stickers is like drawing anything else: you need the fundamentals. In this article, we'll talk about how lines and color work together to create the stickers of your dreams.
Anyone can design or draw stickers and sell them anywhere, even on Redbubble. I firmly believe this because, until the age of 31, I was firmly in the “I will never be able to draw” camp. Five year olds could draw better dogs and cats than I could. My lines were shaky, my proportions were all off, and I couldn't pick colors any better than I could fly a plane. 2 years later, I can push out a few designs a night if I try hard. I've got a style, I've got confidence, and I've got a method. You'll get there, too. I promise. Let's get started!
Why Should I Draw With Stickers In Mind?
Considering stickers as an end product is a great way to give focus and direction to your designs. For example, if you're interested in producing sticker sheets, this means that you won't be creating super detailed designs. Sticker sheets are usually a collection of small and simple designs, like circle thank you stickers or clear stickers. Your sticker sheet will go to waste if your designs are too complex because no one will be able to understand your design.
On the other hand, if you're designing for bumper stickers, you're going to want to constrain your design to certain dimensions. Bumper stickers tend to be large and in charge – the opposite of a sticker sheet or collection of stickers. Text needs to be large and bold, and most of the time, bumper stickers have a very limited color palette. This makes them easy to draw, with high contrast and bold, thick letters.
If you just start drawing without these end goals in mind, your art may not fit the products you end up making. Your sticker sheet will be lackluster – your bumper sticker, hard to read. So spend some time and really think about a sticker sheet you've purchased in the past, or a vinyl sticker from an art store that you just love. What aspects have made it a successful sticker or sticker sheet and not just something that you would have passed by? At the end of the day, you should want to make stickers that other people want to buy. This is especially important when you're creating your own stickers.
Special Considerations for Stickers and Sticker Paper
When you spend as much time thinking about stickers as I do, you'll start to learn a few things. One of the big things is the constraints on the medium. For a sticker sheet, it's absolutely size. But for all stickers, it's a little bit about the sticker paper and finishing materials that you use. For example, it can be difficult to find vinyl sticker paper. Many people will start art with sticker paper that's more like address labels than car decals – and that's alright! But you'll find that some colors or textures really pop on some materials and not others.
You might also notice a white border on many stickers. Let me let you in on a dirty little secret: machine cutters aren't perfect. We often add white borders to designs on a sticker sheet because otherwise, the cuts are going to look a little crooked. This is especially true of cutting sticker paper at home. Even the best calibration isn't perfect, and your entire sticker sheet may look off if you don't have enough white border to offset. Cricut Design Space is notorious for crooked cuts – here's a quick guide on how to fix it.
Printable stickers don't have to be hard. A sticker sheet might take a bit more time, but even that is possible in a home office or studio. Just expect to experiment and have a little bit of patience and grace with yourself as you're first starting out. Die cut stickers are a wonderful project to do at home, and even more fun to sell and make some pocket money with.
Fundamentals of Drawing Lines For Stickers
Art for stickers (and art in general) is really about projecting a 3D concept into 2D space. To do this, you'll need to master three basic areas: lines, shapes, and colors. Anyone can draw a line. Anyone can draw a shape. And anyone can choose a color. So we're ahead of the game already. Let's talk about lines.
If you've got a scrap of paper, or even MS Paint nearby, go ahead and draw a line. It doesn't have to be a fancy line. Just draw any old line you like. We'll talk about how to pick the right kind of line for your sticker art in a moment.
Nothing to it, right? Well, now that I've given you some practice lines, let me ask you this: is your first line thick or thin? Is it smooth or jagged? What do the ends of your line look like? Does it wiggle? Is it perfectly straight? Does it vary in thickness from start to finish?
Critical Self Analysis Is Key To Drawing Stickers
These questions that I'm asking are all key in learning to draw stickers. You'll want to consider these characteristics and how they can help you tell the story you want to tell. A wiggly line on a character could indicate fear or motion. A thick line could indicate something that's more important to look at. Thick lines on inner details could throw your whole illustration off.
Fortunately for you, there's an easy way to improve your lines. Unfortunately for you: it's not a shortcut. The easiest way to improve your lines is by practicing. Everything else that you can do is merely supporting your practice efforts. Lines will make or break your designs – let's see how.
Draw Stickers: Why Lines and Curves Make Your Design
Stickers are an art form that are meant to be aesthetically pleasing both up close and far away. They tend to be small, so they need to be viewable from a distance. Lines and curves tell the story of your sticker even when someone can't read the text that's on it. Learning to draw stickers is about viewing your art in both these ways.
Stickers are often placed on products, so it's even important to think about how people might see your sticker when they're in a store. Would the flow of the lines make them want to pick it up? If this is for an event, does the design reflect that in any way?
How To Analyze Lines and Curves
The easiest way to see the power of lines and curves is to do some artistic analysis. Critiquing others' works can really help you see the flaws in your own attempts to draw stickers. So, let's do an exercise together.
Open A Private Browsing Window
Hit Ctrl+Shift+N (Cmd+Shift+N on a Mac) to open up a new, incognito window. This will keep your searches from influencing your normal day-to-day results. This is important when you're doing market research so that you can keep a clean slate when you're looking at your own products later.
Open A Search Engine and Search For Art
You can use Google, Etsy, Redbubble, TeePublic, even Pinterest or Instagram. It doesn't matter as long as you can get visual results. Put in a search query – maybe “cute dog sticker” or, even better, “cute german shepherd illustration”. To study lines, we want to get bold designs, so you may include “illustration”, “pop art”, “sticker”, “pin”, or “decal” in your search terms to try and draw out those results.
Analyze Your Results

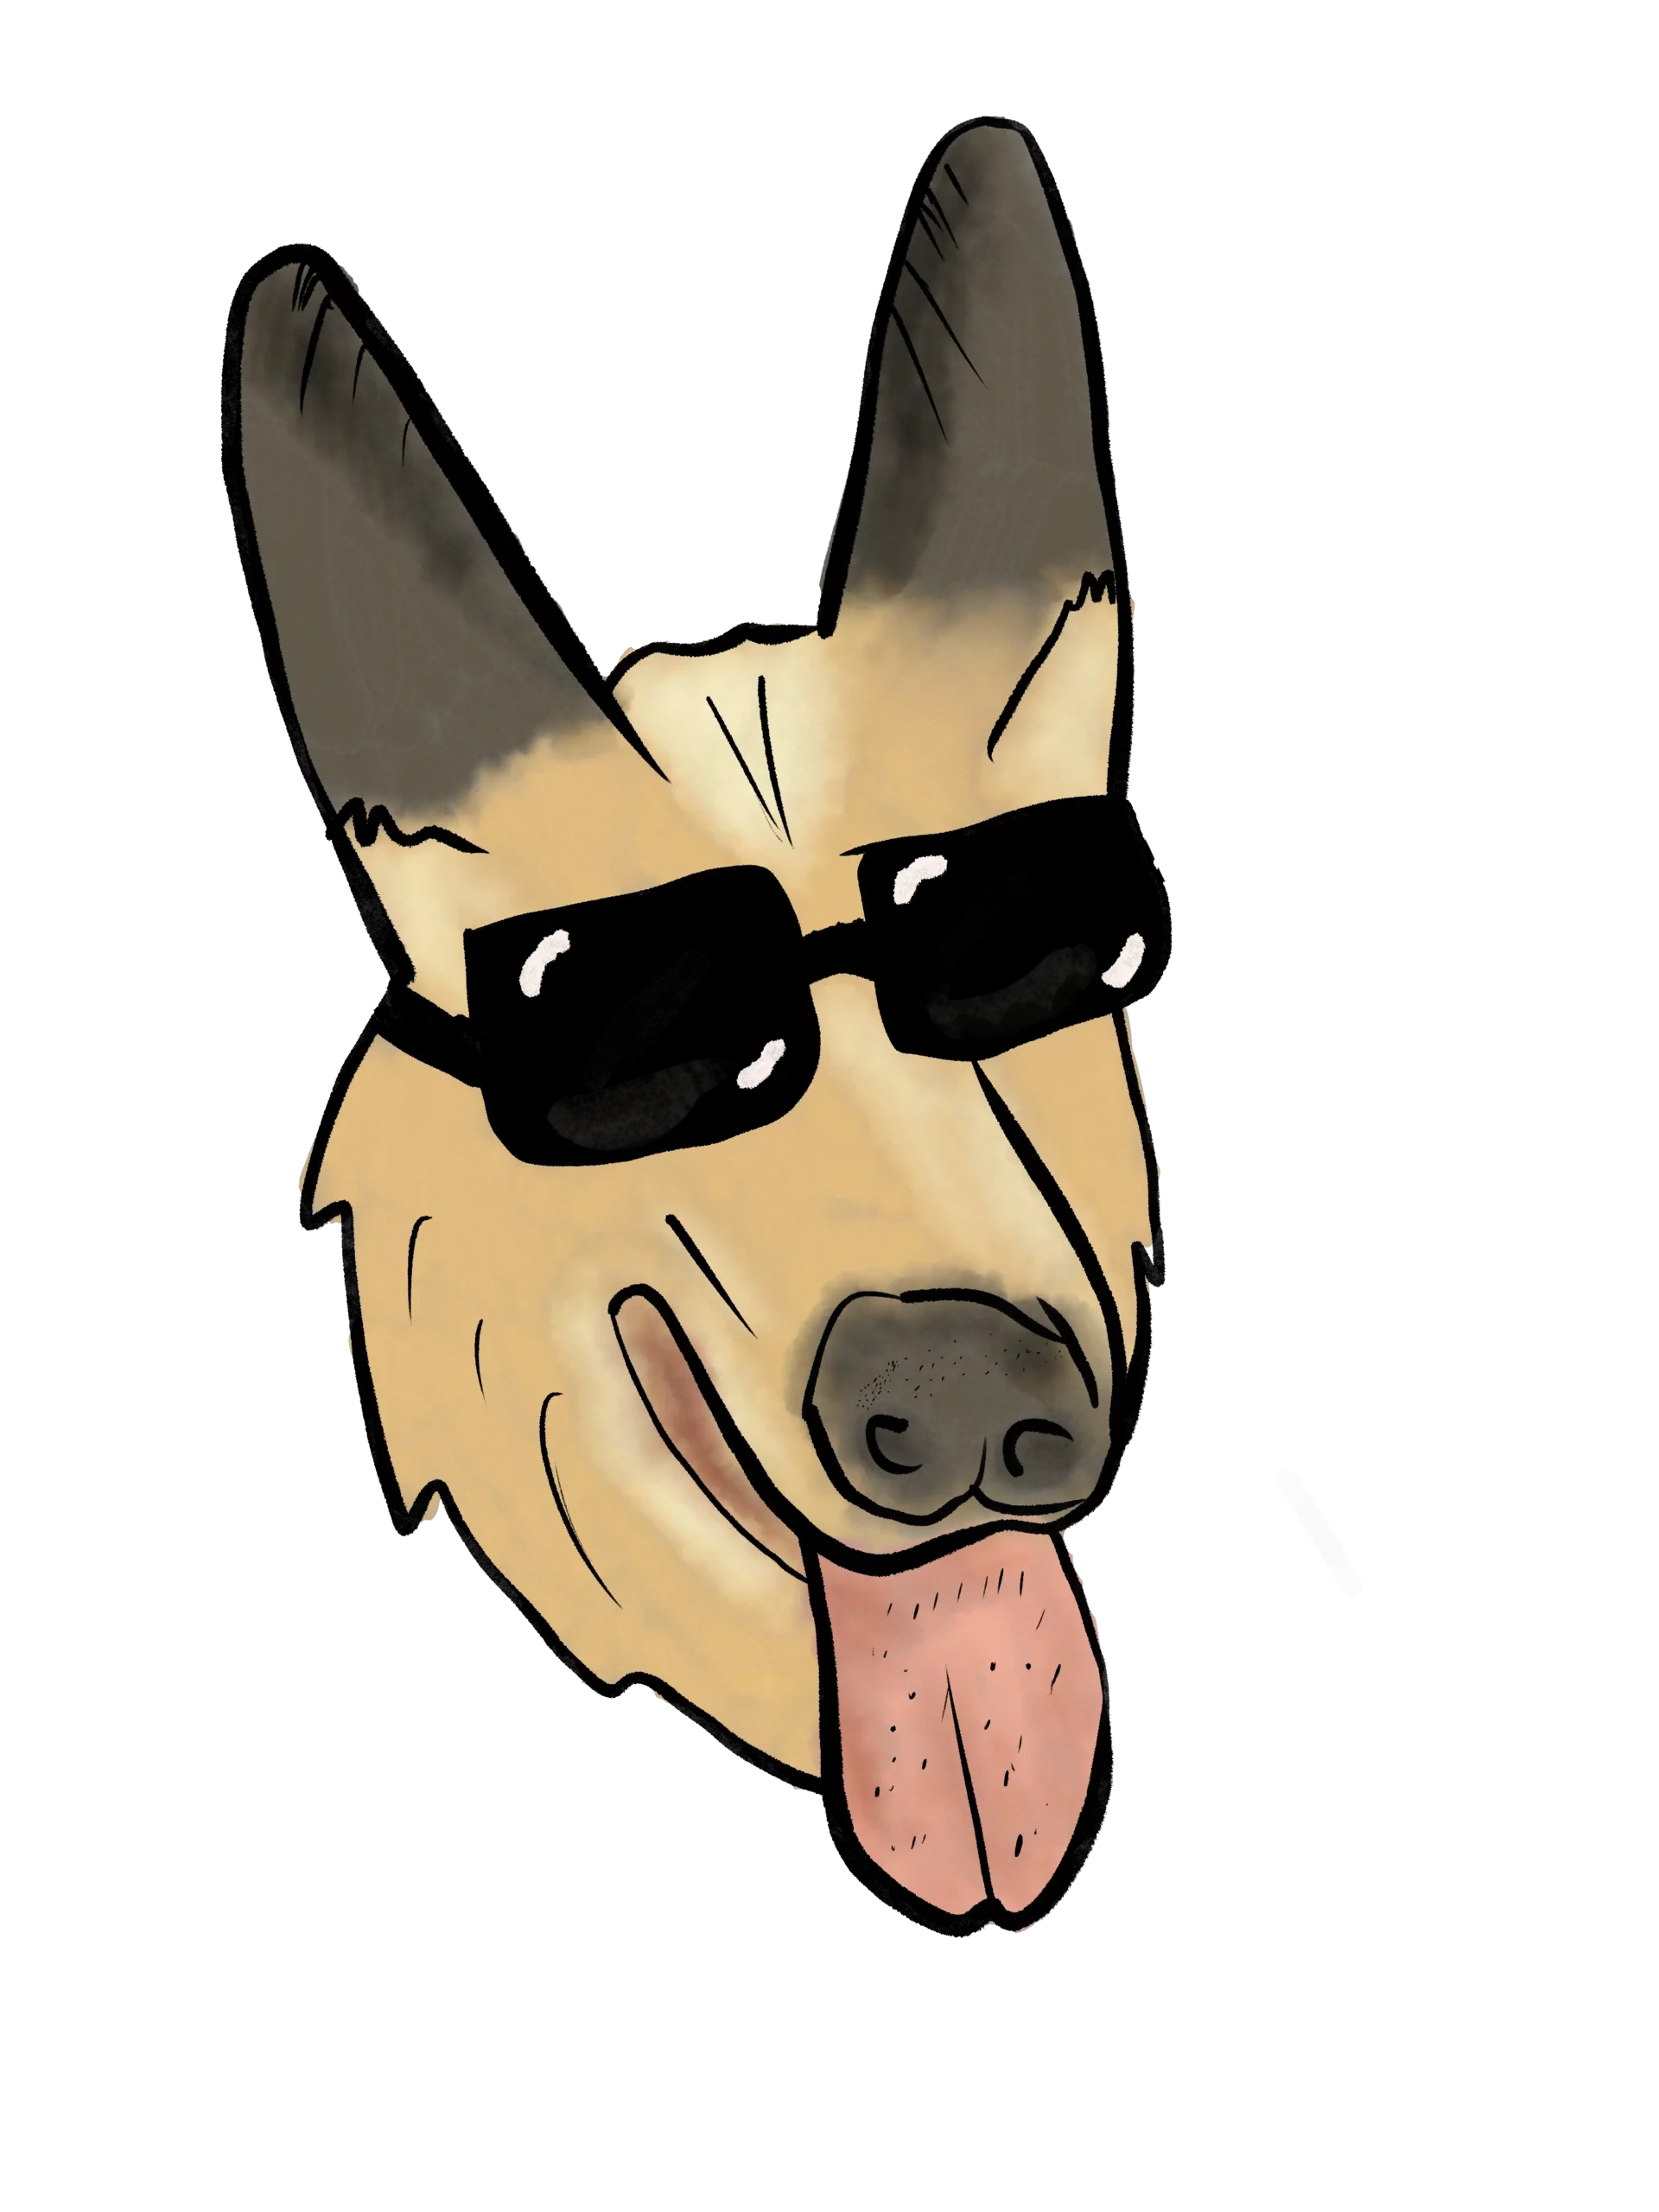
It's not nice of me to put other peoples' art on my blog, so I'll just put one of mine here. I drew a German Shepherd a few months ago. His name is Bones and he is a certifiable Good Boy.
What can you see about my art? I can tell you what I know about my style, but I bet you can find some things I'm not telling you. I like to use big, thick lines on the outside of a sticker design. My inner features like noses tend to have thinner lines. I don't add a lot of fur detail. My inner features tend to be very simple lines and squiggles. The ends of my lines sometimes have tapers, but not always.
What could I have done better? For one – I could have drawn the whole dog. I could've been less lazy and not just slapped sunglasses on him. Yes – that was pure laziness. My lines could have used a bit more variation on width and depth. The design is almost too simple. He's cute, but as of right now, he's not a best seller. Especially because competition for “german shepherd sticker” is very high.
Repeat The Process – And Keep A Journal
Google Docs are great for documenting your thoughts about art, business, and everything in between. Take screenshots or save the images directly to a document and put your criticism in writing. This will help you track how your thinking evolves, what you're paying attention to, and, what lessons you can learn from this process.
Draw Stickers With What You've Learned
It's one thing to talk about someone else's work. It's another to do it to yourself. After you finish a sketch, analyze it: can you try applying something you liked from another artist? Are there shaky lines when it's a smooth piece? How's your line thickness when viewed from far away vs. close up? If you're drawing digitally, make a few sketch layers before settling on your final line work. If you're a traditional artist, using tracing paper is a great way to make quick drafts until you find a design you like.
I don't like prescribing exercises, but a good way to improve is literally to do the same thing five or six times. Draw some eyes? Do it again – and again. Draw 5 different eyes before settling on one. Doing typography? Try it with five different fonts before settling on one. Learning to play with your art is the best way to make it better.
Ok, So What About Choosing Colors For Stickers?
After you've got your lines drawn, it's generally time to color your sticker in. Colors in stickers are, by nature, bold and bright. It comes back again to the fact that stickers are meant to catch your eye from far away, and also be visually interesting up close. If you only choose muted colors, nothing will stick out to your viewer. So, you've got to pick colors that embody the “soul” of your sticker.
For example, let's say you've designed a sticker with some very bright, neon purple lines against a cream colored background. The colors are pretty bold already, so how do you support that purple? Do you want to use other shades of purple? Maybe use a complementary color like pink or yellow? It's better to think about colors as color palettes, not individual colors. That way, the whole design works – not just one color.
Draw Stickers By Choosing The Right Colors
Pinterest and Google are both excellent ways to start choosing colors. Put in a mood or feeling and slap the words “color palette” or “color scheme” on the end of your search. “Autumn color palette” will yield some pretty oranges, browns, and reds. “Vintage neon color palette” will send you straight back into the sixties.
If you have one color, but you're not sure about the rest, the tool Paletton can help. It lets you put a color code in, then it generates some supporting colors. Before I got better at color mixing digitally, I relied on color mixing tools to make decisions for me. Now, I've got a decent understanding of what looks good and how to make it pop.
Some designers like to use Pantone's colors. I personally think that's pretty limiting, but it does make your design look more cohesive and professional (and expensive). When you choose your colors using Pantone, take into account that they're all specifically calibrated to do well in print. Your screen might show them differently!
There are many resources for colors, and you should explore them all. If you're new at art, you might not have a set style yet – so experiment. See what you like. See what your friends like. And mix it up!
Draw Stickers: Tweaking the color palette
If you've got your colors painted and you're not quite sure, save a copy and start over. Tweaking colors in digital art is effortless, and you should do it as frequently as possible.
One easy way to tweak colors is to switch programs. If you're doing digital art in something like Procreate, you can export your image and bring it into a traditional photo editor like Photoshop or the free clone, Photopea. From there, you can play around with image filters and effects to see if any strike your fancy.
Be careful with photo filters, though. At the end of the day, it's better for you to take your new colors and recolor the original painting. You don't want to make changes in one program and not bring them back to the original painting, because you'll lose some control of details. It's better to go through and repaint/shade in the appropriate colors.
Speaking of shading: Add some shadows! Even the flattest illustrations look better with a little shading and highlights. They can help trick the brain into believing the art is more realistic, and might help your buyers cross that threshold and hit the “Buy” button.
Draw Stickers With Shading!
Bold lines only get you so far when you've got miles upon miles of flat colors. Shading is the secret to drawing great stickers. It's the solution to making your drawings look like they're full of life instead of flat. Even in simple shapes, you can add depth to them by adding shadows that give the sense that it's not just a sticker on a piece of paper but an actual object.
First off, don't panic! Shading only looks complicated because you're not used to thinking about it. 2D and 3D animators have to shade many items quickly so they can get onto more important things. Borrowing from their techniques means that you can do the same. There are some easy strategies to shading, and we'll cover them quickly here.
Cel & Proximity Shading
Cel Shading is the process by which we make 2D objects look 3D. It's a well known style that basically involves placing contour lines on your art after you've colored in the flat base colors. Then, you'll just use darker color or two to round out the shadows along the edges. Even though it's relatively simple, many people will leave this for later in the drawing process, because it can be a pain to modify shading on small details.
There's also proximity shading. Proximity shading says that objects that are closer together share darker edges. For example, the space where your neck meets your head and shoulder is dark because those two objects (shoulder, head) are very close. In contrast, there would be no shadow placed on your wrist if your arm was outstretched away from your body. By considering objects that are close to each other, we can create a lazy 3D effect that's perfect for simple illustrations.
As you begin to use shading, you'll likely start using the Layers panel more in whatever digital tool you're using. The Layers panel will allow you to create a new layer purely for shadows and light. This is helpful because your original illustration will remain untouched if you mess up.
Side note – the layers panel is great for combining images for a sticker sheet layout, too. You can combine all of your final illustrations into one image so that your sticker sheet is aesthetically pleasing.
Don't Forget About Light
Lastly, there's light. Light affects all shading styles, so you need to consider how light would be hitting your character or typography. It doesn't matter how you do it, but when you're shading simple objects like stickers is important to consider where the light source is coming from. Looking at your sticker, you can see that one side of it is darker than the other because the sun isn't shining on that half as directly.
It can be hard to identify light at first. That's ok! Use pictures, switch stuff to black and white, and just experiment. Your eyes will tell you when something is spot on, or when it's just a little bit off.
Draw Stickers: How To Improve
The best way you can improve drawing stickers is by practicing. Draw everything you can. Dream about drawing. Critique other art. Critique your own art. Get feedback from friends and family. Social media is great for constructive criticism, but definitely filter feedback through your own eyes. There are a lot of opinions out there.
Finally, you'll note that I barely touched on tools here. That's because the tools don't really matter. Draw by hand, shell out money every month for a subscription tool – whatever floats your boat. The best tool for you is the one that inspires you to keep coming back and drawing more.
Producing Stickers At Home
Now that you've got a basic understanding of how to draw stickers, you should learn a bit more about producing them at home using Cricut Design Space and a Cricut machine like the Explore Air, Air 2, or Maker. You can find a new Cricut machine for just over $100 on sale, and with it comes the free program, Cricut Design Space, to design your “print then cut” projects. A Cricut machine will help you cut stickers in your own home office without any serious knowledge of computers or math. It's easy to do, and easy to scale.
You really only need three things to produce stickers at home. A machine cutter like a Cricut machine, a computer, and access to a printer. Oh – and I guess you'll need to pick up some printable sticker paper, too. But that's almost a given.
Importing into Cricut Design Space
The basic process is as follows. After you've designed your piece and added any borders, you'll want to import it into Cricut Design Space. You should import it as a “print then cut” file at the most advanced color settings, otherwise, you'll lose some detail. When you import it into Cricut Design Space, set it at the size you want it to be.
Your printed stickers will never be larger than 6.75″ x 9.25″ – this is a useful thing to keep in mind, because adjusting sizes can get you more stickers per printable stickers page. Print then Cut restricts you to these dimensions so that it can calibrate and cut correctly.
You should be able to fit six 3″ vinyl stickers per page on Cricut Design Space. You could also fit 2x “half page” sticker sheets – 3.25″ x 4.5″ should be plenty of room there.
Where to buy sticker paper
The best sticker paper that I've found comes from one of two places. A great beginner sticker paper can be found at Avery.com. Yes, Avery – the place that sells business cards and mailing address labels also sells sticker paper. The paper quality is great for indoor use stickers, but they have their branding all over the back. It can feel a little unprofessional.
The winner for sticker paper, in my eyes, is OnlineLabels.com. They have outstanding customer service, tons of material options, and even give out free samples if you want to try before you buy. Their sticker paper is blank on the back, and works really well with my HP laser printer.
How to cut stickers
After you've got your project set up in Cricut Design Space, it's time to cut. You'll click “Make it” in the upper right of Cricut Design Space. It may look slightly different on different platforms – but that's ok. You're smart. You'll be able to find it.
After you get started, you'll see a preview of your cut stickers in Cricut Design Space If anything looks funky, hit that back button and go fix it before you waste time and paper. Most often, I run into Cricut using multiple sheets of paper when I just want to print one page. I can adjust sizes or positioning to try and make them fit on one page instead.
Hit the next button to get to the following screen in Cricut Design Space. The program will then want you to print the sheets to be able to cut stickers. This is good.
How to print stickers
I've found that Cricut Design Space on its own does not produce good quality prints. When I print, I check the little box that says to use the computer's printer dialogue, and then I adjust my settings in there. My presets beat Cricut Design Space prints all the time. So experiment with your printer and find what works for you. If you're using a library computer or UPS, you'll need to Save to PDF instead of printing. Make sure to save the project before bringing the PDF for printing.
Luckily, your Cricut machine doesn't care where you print. It just cares that you have something for it to cut. You'll notice that Cricut Design Space will print a big thick black border around your design – this is what the Cricut machine uses to calibrate and detect your cuts. Do not cut the pages by hand, or it will ruin the Cricut cutting ability.
Where to put the printed sticker paper
If you've successfully printed, it's time to cut stickers. Place the printed sticker paper design up on the upper left corner of your Cricut mat. Get it as straight along the edge as possible. Then, you can load the mat into your Cricut machine and hit the flashing Go button if Cricut Design Space is done with your settings.
If you're using OnlineLabels paper, I have great luck using the Light Cardstock Plus cutting setting for polyester paper. I use the Cardstock Plus setting for printable vinyl sticker paper. Making stickers is really a trial and error process, so remember that it's ok to make mistakes.
After you hit that go button, congratulations! You're making stickers! Whether it's your first or fiftieth time, there is something very satisfying about moving from design, to Cricut Design Space, to actually making stickers. What a pro you are.
If you're using a Cricut machine, you are limited to Cricut Design Space, but Design Space isn't the only option out there to cut stickers. Many folks find success with the Silhouette Cameo or even larger, more professional cutters. It really depends on what funds you have available for your business.
And remember, if you can't afford equipment – we're here to help! You can order affordable, small batch cut stickers right here in our shop.